This logbook gives an example of how to build an OTU table from raw data. Please see the detailed version for more explanations.
Good practice
After each step of the pipeline you should:
- Check the number of reads (from the usearch command or with the grep command)
- Check what the output files look like with the « head » command
Experience design
The present data come from Dr. Elcia Souza Brito experiment. She did 2 x 300 bp, paired-end sequencing. I thank her to accept the use of her data for this tutorial.
Extract archives
Example of files names provided by the company:
- ES1BI1SS06-704-503_S6_L001_R1_001.fastq.gz
- ES1BI1SS06-704-503_S6_L001_R2_001.fastq.gz
Change names to something clearer:
mv ES1BI1SS06-704-503_S6_L001_R1_001.fastq S_R1_rawData.fastq.gz
mv ES1BI1SS06-704-503_S6_L001_R2_001.fastq S_R2_rawData.fastq.gz
Extract the archive:
gunzip S_R1_rawData.fastq.gz gunzip S_R2_rawData.fastq.gz
Explore sequences files
- Check the sequences orientation in R1 and R2
Forward primer (F): 5′ CTCCTACGGGAGGCAGCAG 3′
Reverse primer (R): 5′ CTTGTGCGGGCCCCCGTCAATTC 3′
To check where primers are located, use the grep command:
grep 'CTCCTACGGGAGGCAGCAG' S_R1_rawData.fastq
The F primer has to be at the beginning of the R1 sequences as shown below: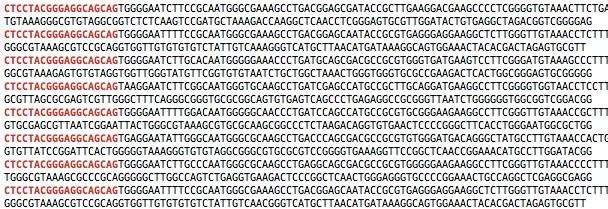
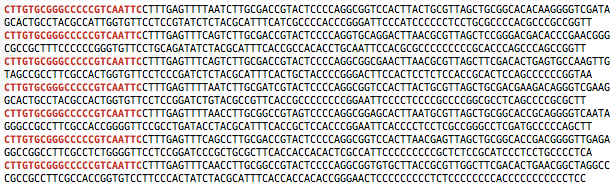
Towards R2 files, it is generally presented with the 5′ and 3′ orientation too, so the R primer has to be at the beginning of the R2 sequences:
grep 'CTTGTGCGGGCCCCCGTCAATTC' S_R2_rawData.fastq
- Count the reads
With the grep command, the number of reads can be easily calculated as we have fastq formatted files. First, check the run identifier and then, count it:
head S_R1_rawData.fastq

grep -c 'M03909' S_R1_rawData.fastq
You can generalize it for all your raw data files with the « * » (star) as shown in the image below:

As you can see, the exact same number of reads is expected for the related R1 and R2 files.
FastQC analysis
With FastQC, the two important features for us here are the reads quality and size distribution.
- Quality
S_R1_rawData.fastq
S_R2_rawData.fastq
The R1 file shows a great base quality. However, the R2 file does not provide a good information (low quality) for the last 100 nucleotides.
- Size distribution
Both files show this graph:
So, we have 50.000 reads of 30-35 nucleotides and 400.000 reads of 300 nucleotides (the population that we excepted).
Here, the R2 file does not give a sufficient information (because of the low quality of 100-120 nucleotides) and that is the reason why only R1 reads will be used (You can see here for more details about R1 and R2 processing).
Barcode and primer removal
The present data were already demultiplexed. That is the reason why, the barcode is missing. To use an appropriate usearch script, we will artificially add a barcode for each sample.
I wrote this python script to do it. You can download it safely. This script will add « AAAAA » at the beginning of each sequences and will create a fasta file needed for the next usearch command. Please refer to the detailed version for more explanations.
Use the add_barcode.py script (requires python2):
python add_barcode.py S_R1_rawData.fastq S
python add_barcode.py PI_R1_rawData.fastq PI
python add_barcode.py PII_R1_rawData.fastq PII
The script add_barcode.py will generate two files:
- barcode_sample.fasta, which contains the barcode sequence and the sample name.
- sample_barcoded.fastq, which contains the sequences with the barcode, added at the beginning.
Then, the usearch command to remove the barcode and the primer sequence. 2 mismatches are allowed for the primer’s sequence, 0 for the barcode’s sequence. The next command uses a python script that you already had downloaded following the Usearch installation. You need to adapt the command line with your own path.
python ~/Documents/Usearch/python_scripts/fastq_strip_barcode_relabel2.py S_R1_rawData_barcoded.fastq CTCCTACGGGAGGCAGCAG barcode_S.fasta S > S_stripped.fastq
The arguments are:
python usearch_script sample_barcoded.fastq primer_sequence barcode_sample.fasta sample_label > output_file.fastq
We can now count again the total number of reads:
grep -c 'barcodelabel=' S_stripped.fastq
or with the output of the usearch script, with the number of « matched »: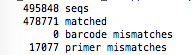
Pool the data
Sequences are now labeled, and we need to pool all of them to continue.
cat *_stripped.fastq > all_reads.fastq
Filtering
This step is usually done in order to select the good sized reads with a good quality. In the present case, reads quality is good, and we will discard the little reads of 30 nt:
usearch -fastq_filter all_reads.fastq -fastq_minlen 250 -fastaout reads_trimmed.fasta
Dereplication
The dereplication is useful in order to group the duplicates sequences. This is mainly used to reduce the computation time of the next steps algorithms. We use here the « prefix » dereplication, it means when a sequence is a prefix (100% match) of an other one, the longer is conserved weighted by the number of sequences grouped.
usearch -derep_prefix reads_trimmed.fasta -fastaout reads_derep.fasta -sizeout
Sorting
As the sequences were grouped (if some identical were found), they have to be sorted by size. This step is also important to remove singletons (unique sequences), which will not be used in the clustering step.
usearch -sortbysize reads_derep.fasta -fastaout reads_sorted.fasta -minsize 2
Clustering step
This step will construct a set of representative sequences from our reads. For more details, please refer to the detailed version and/or the Robert Edgar page.
usearch -cluster_otus reads_sorted.fasta -otus otus.fasta -relabel OTU_ -sizeout -uparseout result_clustering_otu.txt
Chimera filtering
Removal of all chimeric sequences, which have no biological sense. The « gold.fa » file needs to be downloaded.
usearch -uchime_ref otus.fasta -db ~/Documents/Usearch/DB/gold.fa -strand plus -nonchimeras nochim_otus.fasta
Reads mapping
All reads (singletons included) will be mapped on the representative sequences found in the clustering step.
usearch -usearch_global reads_trimmed.fasta -db nochim_otus.fasta -strand plus -id 0.97 -uc map.uc
Taxonomy assignment
New feature in the current Usearch version, the taxonomy assignment can be done with a great accuracy, see here for more details. To use this command, reference databases have to be downloaded. See the detailed in the usearch installation page.
usearch -utax nochim_otus.fasta -db ~/Documents/Usearch/DB/utax_refdb.fa -strand both -taxconfs ~/Documents/Usearch/DB/500.tc -utaxout tax.txt
OTU table finalization
From the « map.uc » file generated during the reads mapping step, a pyton script will construct the text file with the OTU table.
python ~/Documents/Usearch/python_scripts/uc2otutab.py map.uc > otu_table.txt
At this point, three files are important to follow:
- nochim_otus.fasta, which contains the sequence of each identified OTU.
- tax.txt, which contains the full taxonomy assignment for each OTU.
- otu_table.txt, which contains the count of each OTU in the studied samples.
…IN PROGRESS…
